As I’ve mentioned in a previous post, “When your test pattern makes it on stage”, we took on the challenge of making our very first tutu for the Les Danseuses dance production “When Life Happens” during the Covid19 lockdown. It was a lot of work, but such a fun and satisfying challenge to take on. Here are the steps we followed to test the tutu.
Step 1: Pattern drafting
We drafted the pattern for the panty by using the bottom section of my personal leotard pattern. We’ve cut the fabric from cotton lycra, which gives a bit more structure, but is still stretching to fit tight around the contour of the body. Next we’ve marked the lines where to stitch each layer of tulle. We’ve decided on 9 layers, which are spaced out 2cm apart in the front and the back, and 1cm apart in the sides.


Step 2: Cut the tulle
A few years ago, my mom gave me a bunch of tulle in different colours, so to save money, I’ve decided to just use this, remember this is only a test version, so I figured it will be fine if it doesn’t match. We sorted them according to colour and because it was off-cut pieces of fabric, we needed to measure each group and determine which colour will go on top, because that needs to be the longest layer. For a pancake tutu, the width of each layer gets shorter by 1 inch (2.5cm), so we went on and cut the layer in the different sizes. The reasoning behind this is that the shorter bottom layers push the fabric up form underneath, giving you the pancake design.

Step 3: Gather the tulle
Next we needed to gather the tulle. We first used a gather foot, that we bought second hand form a retired seamstress for a bargain and Francisco was so excited to try out his new gadget, but soon he realised something was wrong, the fabric did not gather. It turned out that the leaver feeding the fabric was bent, but luckily he could fix it. So we’ve set the gather foot setting on the largest and started with the gathering. Although it took quite some time, it worked quite well and much faster than doing it with a basting stitch. However, after the first layer was done, we’ve decided that we would like the gathers to be tighter, so in the end, we just used twine instead. To use this, you simply align the twine onto the wrong side of the fabric at the seam allowance and zigzag stitch over it. Then you gather the tulle by sliding it together on the twine (similar to rufflet curtains).


Step 4: Stitch the layers
Finally we could start to stitch the layers to the panty, so we’ve started with the top layer, and worked our way down. According to the information we found, the process of stitching the different layers to get the pancake style effect, is to alternate the direction of each layer. The first layer will point upwards and the next layer will point downwards. So we aligned the first layer right sides together with the panty at the marked line and stitched with a zigzag stitch, to still allow for movement, because the panty is made from a knit fabric. For the second layer, we’ve stitched the tulle wrong side to the right side of the fabric, so the tulle is pointing downwards. We’ve continued alternating each layer until all the layers were complete.

Step 5: Finish the panty
Next up, we stitched the centre back together, making sure that the tulle layers meet and then finished the gusset. Lastly we’ve added elastic to the leg line.

Step 6: Steam the layers
This was more difficult that I anticipated, because you don’t have enough hands to keep the fabric out of the way. So in the end, we tied the top layers with a ribbon to keep them out of the way, and then steamed the bottom layers. This step is so important, because this is where you press those nice iconic pleats found on a tutu.
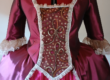
Step 7: Making the bodice and plate
Finally we made the bodice using a deep red stretched velvet and attached it to the tutu. The first plate is cut from a shiny organza fabric to add that bit of shimmer and bling. Then we’ve made a second plate and a mantel in the same stretch velvet fabric and attached that to the tutu. The plates were sewn on by hand to the bodice using a slipstitch. Lastly we’ve embellished the tutu with sequence to add a bit of sparkle and feathers to accentuate the bird character.


What will we do differently
In the end this tutu was a success and we did end up using it on stage for the bird character in the opening scene, but we were disappointed with how the tutu sagged a bit. It looked more like a romantic style tutu than the pancake style, so we identified two possible reasons for this. Firstly, the width of the tulle layers was too long, so it is better to start with a shorter width and then cut each layer 1 inch (2.5cm) shorter from there. Secondly, alternating the layers up and down when stitching them to the panty, is not enough to push the fabric up, so we will rather only stitch the fabric right sides together so that all of the layers point upwards. We’ve fixed these mistakes for the other tutu scene, where we made 6 identical tutus. I’ll do a future post on this, so keep your eyes out for that.
Thanks for reading!
Watch out for our next blog post where we look at manipulating a basic leotard pattern to create a gorgeous dress with a sheer back.
Online Courses
If you are interested in learning how to sew, sign up for one of our online sewing courses and start sewing in the comfort of your own home. Beginner, Intermediate & Advanced courses available to suit your skill level. Sign up now at https://online.craftchic.co.za/
Digital Patterns
Visit our online store and get your digital pdf patterns for your favourite items. There is a variety of patterns available, including dresses, skirts, tops, pants, casual wear and everyday household items.